
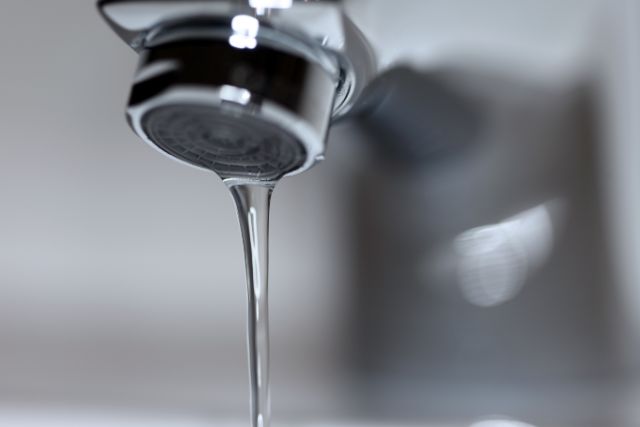
As an expert, I can tell you the Delta touch faucet dripping issue is quite frustrating. The constant drip not only wastes water but also tests your patience. With my years of experience with Delta faucets, I’ve pinpointed some common causes and solutions to the dripping problem
If your Delta Touch faucet is dripping, it could be primarily due to:
- Debris or sediment
- Worn-out seats & springs
- Faulty cartridge
- Malfunctioning solenoid.
When the cartridge becomes worn out or damaged, it may need to be replaced to fix the water flow. Clearing out any debris or sediment in the faucet can also fix the problem. In addition, if the solenoid, which controls touch functionality, does not close properly, it may need to be adjusted or replaced.
Let’s discuss the reasons behind your Delta touch faucet dripping in detail. I’ll also be discussing easy solutions, so keep reading.
Table of Contents
How To Fix The Delta Touch Faucet Dripping
Your Delta touch faucet could be leaking either from the handle or from the aerator. If water is dripping from the aerator it means the aerator itself is faulty or the seats and spring might have worn out.

But, if the water drips from the handle it indicates the cartridge is damaged. Usually, tightening the nut-holding cartridge fixes the issue. However, if the leak is still there you need to replace the cartridge
1. Clogged Aerator
If your single-handle Delta faucet kitchen faucet drips from the spout outlet it’s due to a clogged aerator. If you don’t know what an aerator is, the aerator is a small screen located at the end of the faucet spout that can become blocked with mineral deposits or debris over time.
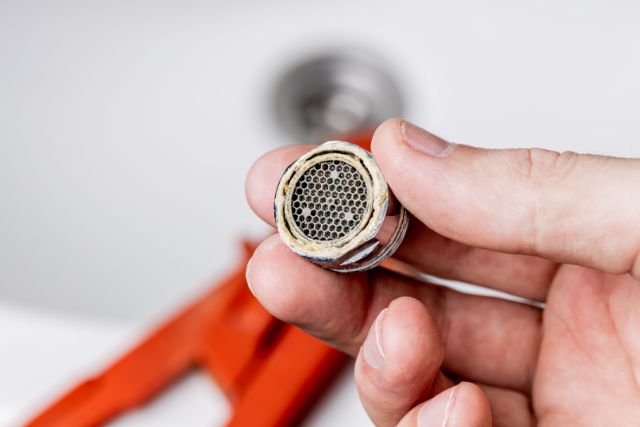
To resolve this issue try flushing out any debris from your Delta Touch faucet system.
How To Flush Out The Debris From Delta Touch Faucet System
Follow the steps below to clean the faucet system by flushing it out:
Step 1: Start by removing the aerator.
Step 2: Turn off the water supplies.
Step 3: Turn the faucet handle to the “on” position.
Step 4: Now, turn on the water at the supply.
Step 5: Let the water flow through the faucet and supply lines for about a minute.
Step 6: While flushing, check for any debris and wash it off from the aerator.
Step 7: Once done, turn off the water using the faucet handle.
Now, verify whether the faucet is dripping again or not. You shouldn’t have any dripping issues if you have followed the steps carefully.
2. Worn-Out Seats & Springs
Another reason behind your delta touch faucet dripping is worn-out seats and springs. Delta faucets are designed to perform leak-free.

However, it’s normal for seats and springs to wear out and needs to be replaced occasionally, depending on the water conditions in your area.
How To Fix:
Here’s a step-by-step guide to help you resolve the dripping issue with your Delta touch faucet:
Step 1: Start by shutting off the water supply to the faucet.
Step 2: Cover the drain opening to prevent any parts from falling into it.
Step 3: If your faucet has a lever handle with red and blue hot/cold buttons, gently pry them off to expose the set screw. Use a hex key (usually 1/8″) to loosen the set screw and remove the handle.
For a knob handle, pry off the handle button, unscrew the screw with a Phillips screwdriver, and lift off the handle.
Step 4: Unscrew the cap in a counterclockwise direction and lift it off. If the cap is difficult to unscrew by hand, try loosening the gray or white adjusting ring within the cap and attempt again.
If it’s still challenging, place an adjustable wrench at the top and turn it counterclockwise. To protect the faucet’s finish, you can place a jar opener gripper or a towel between the cap and wrench.
[Warning: If you notice the cam turning as well, stop immediately and seek the assistance of a plumber.]
Step 5: Lift up the cam, packing, and ball by grasping the ball stem.
Step 6: Remove the seats and springs. You can use a pencil or an Allen wrench to lift them out.
Step 7: Wipe the inside of the faucet body using a soft cloth, paying attention to the area where the seats and springs were placed.
Step 8: Place new springs (according to your shower model) over new seats and insert them into the sockets within the body using a pencil or an Allen wrench. Ensure the small end of the spring goes into the seat and the large end goes into the faucet body.
Step 9: Check the stainless steel ball for any damage or mineral deposits. If necessary, clean it by soaking it in vinegar and wiping it with a rough towel. If the ball appears scratched or damaged, you may need to replace it.
For a round-stem ball, use Delta Genuine Part RP70. For a diamond-stem ball, use Delta Genuine Part RP212. Place the ball into the body, ensuring the lever handle faucet has its small straight steel pin engaged with the slot on the side of the ball.
Step 10: Place the packing and cam over the ball stem, aligning the tab on the cam with the slot in the body. For a lever-handle faucet, make sure the peak of the triangle in the cam faces the spout. Press down firmly.
Step 11: Partially unscrew the adjusting ring, then position the cap over the ball stem and hand tighten it onto the body while pushing down on the cam to keep its tab engaged with the slot in the body.
Step 12: Gradually tighten the adjusting ring until no water leaks around the stem when the faucet is in the fully on hot and cold mixed position and pressure is applied downward on the handle.
[Note: Adjusting the ring also determines the ease of handle operation. Avoid over-tightening, as it can cause premature wear on the seal surfaces, requiring more frequent repairs.]
Congratulations! You’re done. If the leak persists, check the faucet’s stainless steel liners. If they are missing, damaged, or sticking up above the brass valve body, it’s best to replace the entire faucet.
3. Faulty Cartridge
If the above solutions don’t work and the leaking still persists you need to replace the cartridge. To replace the cartridge of your leaking Delta shower faucet, follow these simple steps:

Step 1. Before starting, turn off the waterline to ensure no water is flowing.
Step 2. Use a metal pry tool to carefully remove the cover for the handle.
Step 3. With a screwdriver, remove the screw that holds the handle in place.
Step 4. Take off the handle and the housing of the faucet.
Step 5. Use a strap wrench to loosen and remove the nut that secures the cartridge.
Step 6. Pull out the old cartridge and insert the new one. Ensure that the replacement matches the hot and cold sections of the faucet. Pay attention to the grooves on the cartridge side to confirm proper installation.
Step 7. Put everything back together and turn on the waterline. This simple process should effectively fix your leaking Delta shower faucet.
Meanwhile, you can watch the below video for a better understanding of Tutorial: Delta Faucet Cartridge Replacement
4. Malfunctioning Solenoid
Another major reason behind the Delta touch faucet dripping is a bad solenoid. The solenoid may not be closing all the way and allowing water to leak.

This happens because minerals build up in the faucet, preventing the solenoid from closing completely.
How To Fix:
To fix your Delta Touch faucet, you’ll need two things: an air blower and vinegar. Start by removing the faucet and taking it apart gently.
Use an air blower to remove any minerals that might be preventing the solenoid from shutting down. For the faucet parts, try using vinegar. It’s a useful agent that can dissolve mineral build-up and help restore proper functionality.
If that doesn’t solve the issue, contact the Delta professionals if you have a product warranty left. They can diagnose the problem and do the necessary replacements as necessary.
For a complete troubleshooting of the solenoid see delta touch faucet solenoid not working
5. Old And Weak Batteries
The last reason is the batteries in your Delta Touch faucet are old and weak. Weak batteries can cause the faucet to drip since they control the solenoid, which controls the flow of water.
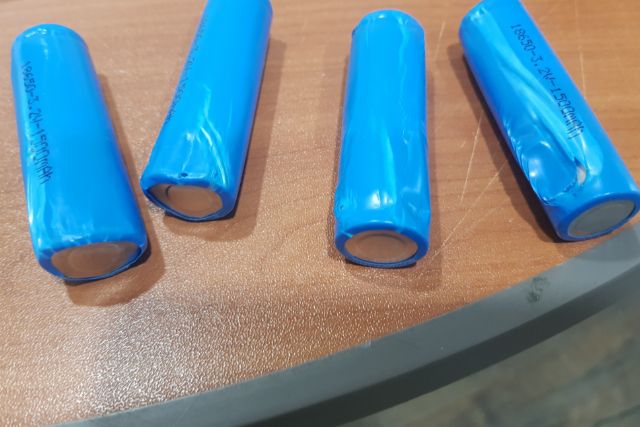
The LED indicator light on the base of the faucet will start blinking red when it is time to change the batteries.
How To Fix:
To replace the batteries of Delta touch and touchless faucets, you need to find the battery housing, pop its cap off, and replace the batteries with new ones. If confused check the user manual or contact Delta support.
What Happens If You Don’t Fix A Leaky Faucet
Ever thought of the risks of not fixing your leaky Delta touch faucet? Ignoring a leaky faucet can lead to several negative consequences, including:
- Increased water bills: A leaky faucet can waste gallons of water, causing your water bill to skyrocket.
- Dripping sound: Dripping sounds are very annoying for some people, especially while sleeping or doing something important.
- Waste of natural resources: A leaky faucet wastes water, which is a limited natural resource
- Structural damage: Ignoring a leaky faucet can lead to damage to your home’s structure, including mold growth, damage to surrounding areas, and deterioration of caulk and grout.
- Plumbing issues: A leaky faucet can put added stress on your plumbing and cause drain clogs and overflows.
- Higher repair costs: If you ignore a leaky faucet, it can lead to more significant plumbing issues that will require more expensive repairs
Hence, it’s essential to fix a leaky faucet promptly to avoid these negative consequences.
Delta Touch Faucet Maintenance Guide
Here are some maintenance tips for your Delta Touch faucet. By following these tips you can extend the lifespan of your Delta touch faucet.
- Clean the faucet regularly: Delta recommends cleaning the faucet with a soft cloth after each use to prevent mineral deposits
- Check the battery: If your Delta Touch faucet isn’t working, the battery may be low or dead. Follow the manufacturer’s manual to replace the battery
- Inspect the spray head: Make sure the spray head is not clogged
- Check the LED light: If the LED light is blinking red, it could indicate a problem with the solenoid valve or the battery. If so, you can check out our effective Delta touch faucet blinking red troubleshooting guide.
- Contact support: If you need technical help with your Delta Touch faucet, you can contact the Smart Faucet Concierge Support Team.
You can also consider resetting your delta touch faucet if you face any problems. Resetting can often resolve common problems and restore the faucet’s functionality.
FAQs:
Where Is The Model Number On a Delta Touch Faucet?
To find the model of your faucet, check the packaging near the UPC code or the top of the box. For faucets made after 2012, look for a model identification tag attached to one of the supply lines.
Where Is The Reset Button On Delta Touch Faucet?
There isn’t any physical button on the Delta touch faucet. To perform a reset, simply remove the battery from the pack and wait for 30 seconds before putting it back. This simple step can help reset your faucet and fix the issue.
Why Does My Faucet Have A Steady Drip?
If your faucet is leaking, it’s often due to corrosion, worn-out gaskets, or mineral buildup. However, the good news is, that many leaks can be fixed by homeowners with the right tools.
The Bottom Line
To wrap up, there are four reasons that cause the Delta touch faucet dripping issue. I hope you’ve found the solution to my article. One pro tip always refers to manufacturer guidelines while performing a repair.
If the product has a warranty period left contact Delta customer support for the solution. Furthermore, you can see more here delta touch faucet blue light not working.
About James
James founded HomeUpgradeLab & was sharing his experiences to fix issues related to bathroom and toilet fixtures & fittings. Read to know more about James Hill & how he started this blog.